CHAT ABOUT THIS TOPIC – Click Here
Bower Power Hour: Click Here
Bower Power Hour Episode 13: Click Here
Tech and Tools Installing an ARB Air Compressor: Click Here
“30Pack” Matt is the Tech and Tools guru from Bower Power Hour. He walks guests through installs, tech, buying parts, and more. All work is done either on Matt’s personal buggy or the Craigslisticon, Bower Power Hour Producer Gabe’s jeep for both offroad and daily driving. In this episode of Bower Power Hour‘s Tech and Tools segment”30Pack” Matt walks viewers through the process of installing an ARB Air Compressor on the Craigslisticon.
 Matt: Today we’re going to talk about installing a ARB On-Board High Performance 12 Volt Twin Air Compressor and Air Compressor Manifold Kit for airing up tires and running the ARB Air Lockers on Gabe’s “Craigslisticon” JK. We mounted it under the seat with a Carolina Metal Masters JK Air Compressor Mount and used the simple sPod Adapter Harness for ARB Compressor to hook it all together. Then we added an auxiliary tank that Gabe scored off of Craigslist.
Charlene: How did the project go?
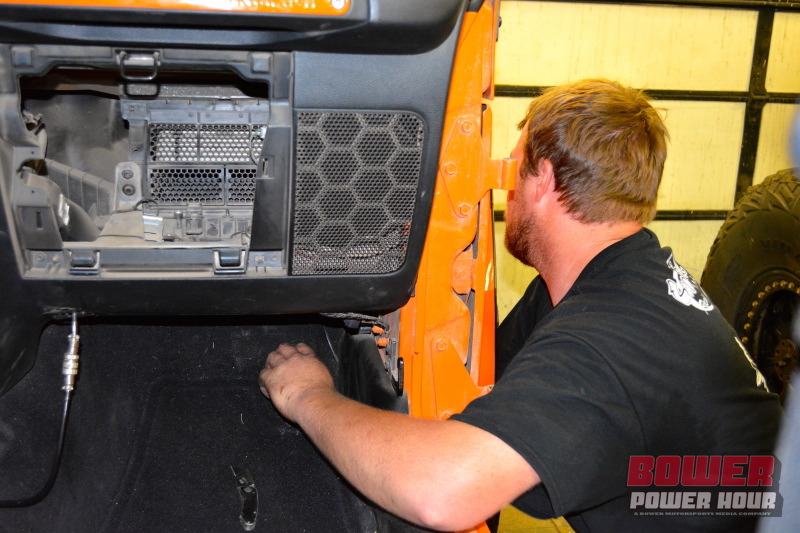
Matt: The bracket we used was from Carolina Metal Masters. They had a great idea when they decided to utilize all the extra room under the passenger seat. The install worked out really great for running the wiring harnesses that came with the ARB. It was helpful keeping all the electronics out from underneath the hood. This made the air compressor super accessible to use and keep clean.
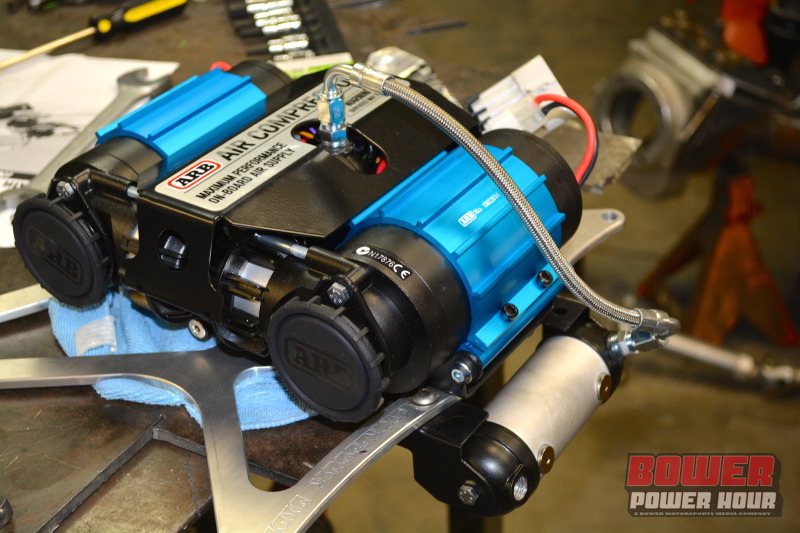 Charlene: The parts we had were the ARB Air Compressor, an ARB Manifold kit, an Air Compressor Tire Inflation Kit, and an Inflator with a Gauge. ARB really helped us out by getting us everything that we needed. It was even orange!
Matt: We mounted the compressor underneath the seat and used the ARB manifold to run the line from the air compressor to the solenoids which will run to the ARB lockers. The location really helped us simplify the wiring. The wiring harness that ARB included was already set up to have the solenoids real close to the compressor. We were able to do that with the manifold kit and were also able to run a line back to our 3 gallon air tank so that we could have 150 lbs. of air on hand to air tires and run air tools.
Charlene: How did you put everything together? Like everything, nothing is easy, is it?
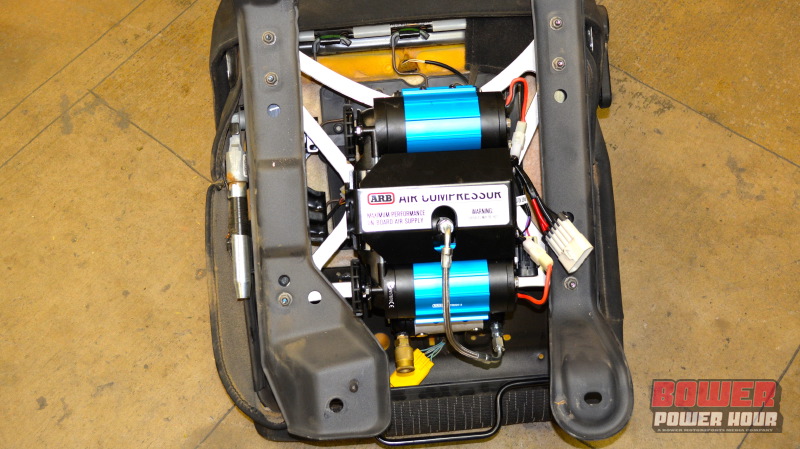 Matt: I think Gabe’s Jeep was built on a Monday because even though the holes on the Carolina Metal Masters plate were oversized to accommodate difference we had to make them even bigger so the plate would fit. We oversized the holes one little step and then we were able to get it bolted in no problem. The plate was really convenient because we were able to use another hole on the plate to mount the manifold. The only problem we ran into was the air line that came out of the compressor. When we bolted the seat in we noticed the line that came out of the compressor was hitting the floor. We decided if we turned that fitting just slightly, it would put that line in the crease of the body. So we pulled the seat back out, loosed the manifold housing within the compressor and rotated it 20 degrees, tightened it back up, and it fit perfectly.
We were able to find a grommet in the fire wall where the factory wire harness passes through and put the ARB harness through to the battery. There was just enough extra to trim it back and make it neat, and also enough wire to run our ARB harness over to tie into our sPod ARB harness. This allows us to use the sPod switches that Gabe already has in his Jeep, instead of installing the included ARB Switch.
 We got the air compressor installed under the seat, put it back together again, plugged in all the wires, and it worked like a charm! We were able to use the ARB E-Z Deflator Kit to take some air out of Gabe’s tires and then aired it back up to test our work. We were really impressed. Without the air tank behind it, the ARB Compressor was able to fill a tire from trail pressure to street pressure in 2 min and 55 seconds. When we mounted the supply tank in the back of Gabe’s Jeep, we added a lot of volume. Volume with compressed air is key. It reduced our fill up time to 1 min and 15 seconds. We were excited! By the time we fill up one tire the ARB already has the air tank filled to 150 pounds and was ready to go again!
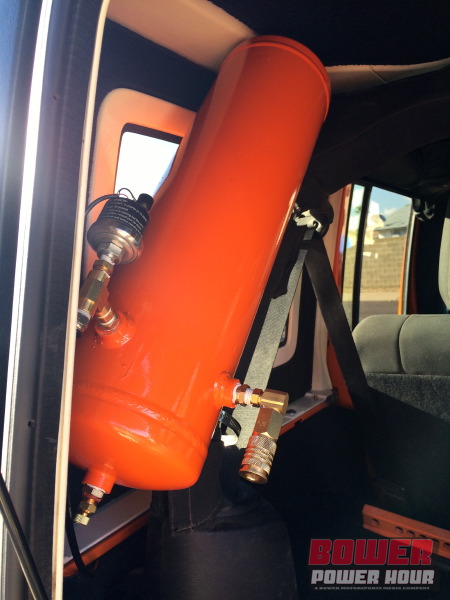
Charlene: Adding to our “Craigslisticon”, Gabe went out and bought an air tank on Craigslist and then you took it into the fab shop to work on the mounting?
Matt: Yes. The tank Gabe got was generic with some flat feet. We went ahead and cut those off and welded on some saddles that I made to fit perfectly over the rollbar. We got it sand blasted, Gabe did his ‘auto paint job’ and it turned out awesome! We finished off the project by using some hose clamps to hold it to the roll bar and plumbing with quarter inch nylon lines.
 Charlene: We are really excited to have added the ARB Air Compressor into Gabe’s Jeep and look forward to moving onto the front axle in the Episode 13!
Our Parts List: (Click to go to Website for More Info)
ARB On-Board High Performance 12 Volt Twin Air Compressor
Air Compressor Manifold Kit
Carolina Metal Masters JK Air Compressor Mount
sPod Adapter Harness for ARB Compressor
Air Compressor Tire Inflation Kit
Inflator with a Gauge
ARB E-Z Deflator Kit