Differential Fluid is as important as engine oil and radiator coolant, but it isn’t as familiar to understand how to check and replace. Differential fluid is gear oil that helps lubricate the gears, ring, and pinion within your rear and/or front lockers. The fluid is held inside the housing of the axle. Differential fluid needs to be checked and changed regularly. It can be changed around 30,000-36,000 miles, or in some cases, it may be as frequently as every 15,000 miles.
Checking Differential Fluid
Sometimes you have the opportunity to check your fluid and sometimes you don’t. The significant difference is the diff cover. Some have an oil plug that is at the fill line, others have covers that aren’t significant to the fill level. (See the article on Diff Covers)
If you open the oil plug and you can see fluid, then it is fine. The second part of checking the diff fluid is to see if it looks milky meaning water has gotten into the oil or if there are any metal shavings at the bottom, identifying an issue with your gears. You can use a clean magnet stick to put down into the oil to see if there are shavings.
Changing the Differential Fluid
 Drive the vehicle for a few minutes, warming up the gear oil.
- Gather a large catch pan, rags and the appropriate size tools for the oil plug.
- Consider changing into clothes that are ready to be thrown away. Gear oil smells awful and is a challenge to get out of clothes.
- Open the cover to drain the gear oil, being aware of where the oil goes.
- If there are multiple oil drain holes, open the fill hole at the top and then open the drain plug at the bottom letting the oil drain.
- If there are no oil drain holes, begin unscrewing the diff cover housing bolts. Take out the bottom bolts first. As you work up around the housing, don’t take the bolts out all the way just enough to create a containable drain area, leaving the top bolts in place. Once it has stopped draining, proceed to take out all the bolts.
 If you unscrew the bolts and the oil isn’t draining, you will need to gently use a screwdriver to help release the pressure between the gasket and the diff cover. Be gentle to not scar the housing or the cover. Keep the bolts as mentioned in option B, to keep the oil contained in the bucket.
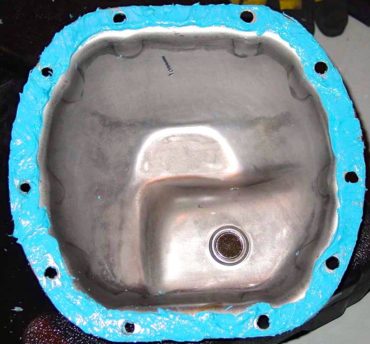
- Once the oil has drained, undo the rest of the diff cover bolts and take off the cover.
- Time to inspect what is going on.
- Are there metal shavings in the oil? A lot can be an issue; a little is common.
- Are all the teeth still noticeably perfect on the ring and pinion? Rotate to verify. Any nicks should be evaluated to be replaced.
- Go to town Cleaning. Clean. Clean.
- Use a shop rag to wipe out as much of the excess oil as possible. Make sure to get into all the small areas that could keep metal fragments.
- Use a razor blade or some light sandpaper to clean the gasket from both sides of the housing and cover.
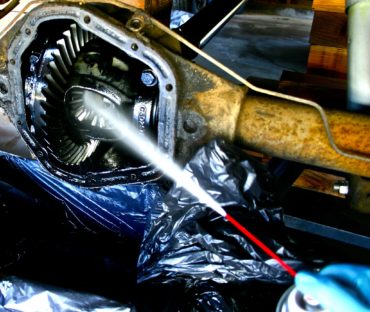
- Use Brakleen and lint-free shop rags to do the final clean on the inside of the housing.
 Putting it back together starts by using either a pre-made gasket or liquid gasket.
 - Put the two sides together and start bolting from the top, down to the bottom. Once finger tightened as far as possible, tighten to the vehicle specs with a torque wrench. These specs can be found in the manual for stock applications, or on the aftermarket websites.
- Fill it up! About 3 quarts, but need to look for your specific specs.
- If there is a fill hole that represents the fill line, pour in the fluid, or use a pump or hose to help it get into the correct location.
- If there isn’t a fill hose that represents the fill line, be aware of the amount of fluid you are putting in.
- Close the fill hole, tightening to specs. Look around the seal for any fluid leaking.
- Take the vehicle for a spin around the neighborhood putting a heat cycle on the vehicle. Pull it back into the garage and check again to make sure there isn’t any fluid leaking around the diff cover.
Charlene Tip: Take the disgusting smell seriously. This is an oil mess you don’t want to clean up, well, you really can’t. The smell stays! It’s as bad as a skunk in the odor stays! Use extra caution when setting up your work environment and when removing the cover. If you are questioning, black trash bags over the garage floor are a great idea!

The Right Fluid
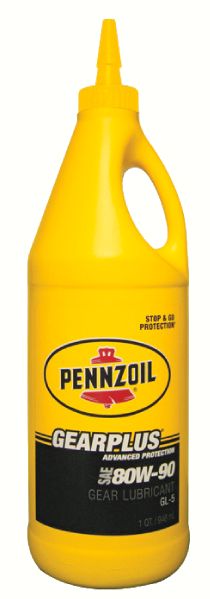 The right fluid is considered Gear Oil. The weight of oil and quantity will depend on the type of vehicle you have. Generally, you are going to find 2-3 quarts of 80w-90 is a pretty standard option. Your owners manual will have this information easily available. If you replaced your axles, gears or diff cover with an aftermarket option, be sure to look into the quantity of oil necessary based on the new application.
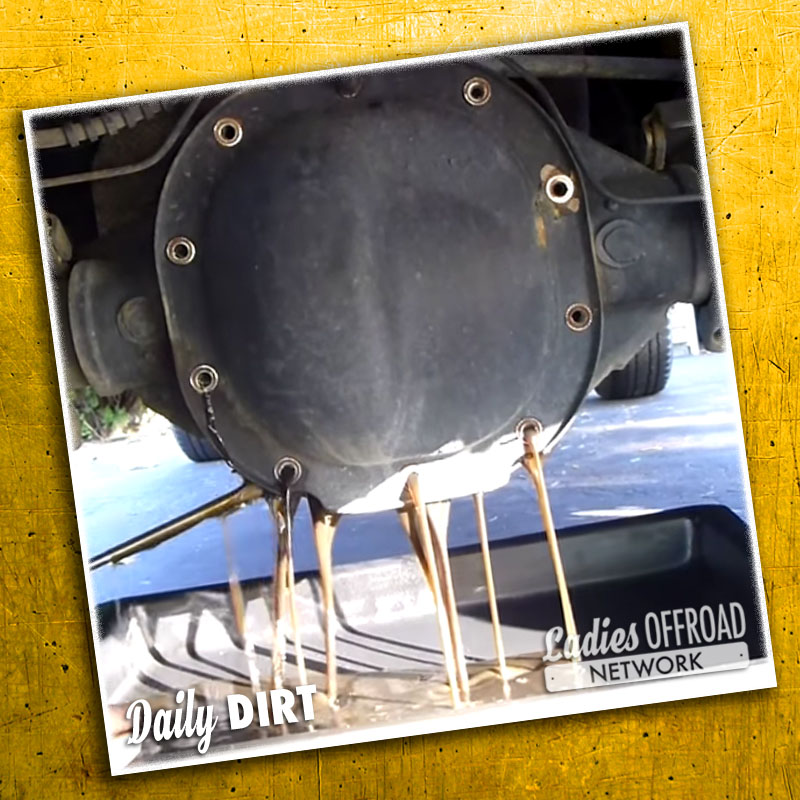
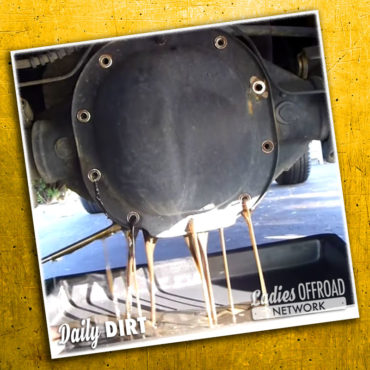
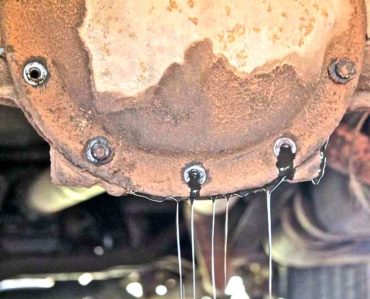
Leaking Vehicle
When an off-road vehicle drips fluid, the diff cover is one of the primary areas it could leak from! There are a couple different reasons why, but most commonly the rear diff got drug over some rocks rubbing the cover down exposing the gasket or pulling the gasket out of place. If you have a leak coming from your diff cover, it is usually a simple fix by replacing the gasket. You will need to evaluate the cover to see if it is time to change. (See article on Diff covers). If you need to wait to replace or fix the problem, be sure to pay extra attention to the fluid levels to keep them at correct operating specs.
What's Next
Go roll under your vehicle. Look at your front and read diff covers. Can you identify the fill hole and drain plug? How is your cover looking? Is there fluid seeping from around the gasket?
Charlene Idea: Next time you have a service done ask if you can stay to look over their shoulder and see the insides. Look and learn. I would suggest offering an extra $50 or a case of beer for this opportunity. 🙂 Mechanics like to work fast and without anyone around – don’t take their time for granted.
Changing your fluid may not be your thing. I understand! But being aware of your vehicle and making sure that all fluids get serviced when working with your mechanic is important. Knowledge is power.
Additional Resources
Bower Power Hour: bowerpowerhour.com/tech-tools-rear-axle-install-on-the-craigslisticon
Author: Charlene Bower
Share with your Friends on Facebook:
Share with your Friends on Instagram: