CHAT ABOUT THIS TOPIC – Click Here
Bower Power Hour: Click Here
Bower Power Hour Episode 17: Click Here
Tech and Tools Installing a Yukon Gear Master Install Kit: Click Here
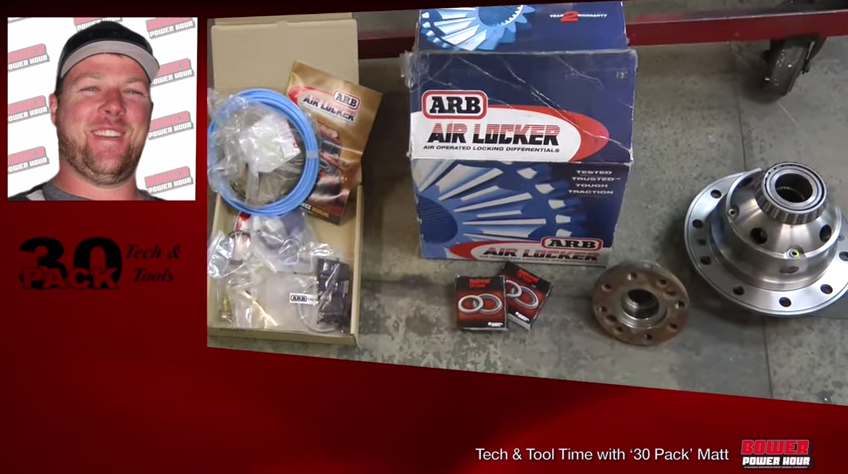
“30Pack” Matt is the Tech and Tools guru from Bower Power Hour. He walks guests through installs, tech, buying parts, and more. All work is done either on Matt’s personal buggy or the Craigslisticon, Bower Power Hour Producer Gabe’s jeep for both offroad and daily driving. In this episode of Bower Power Hour‘s Tech and Tools segment “30Pack” Matt walks viewers through the process of installing a Yukon Gear Master Install Kit.
 Matt: Today we are continuing our build on the Dana 44 front axle for Gabe’s Craigslisticon.
Charlene: Awesome. And we have the ARB air lockers that he bought off Craigslist, right?
Matt: Yep. We were originally going to go with 4.88 gears, but we decided to change ratios to 5.13 because Gabe found a smoking deal on a second hand Currie Rock Jock 50 for the rear, that already had 5.13 installed in it. Luckily we didn’t have any of the core parts yet and were able to change our minds on that.
Charlene: Cool, so we got the Yukon Gear Install Kit for the 513s right?
Matt: We went with Yukon Gear & Axle because of all the support they put back into the off-road community. We ordered their Master Install Kit because the housing was bare, we didn’t have any of the internal pieces to start with. We needed all of the bearings, all of the seals, a new pinion nut and everything.
Charlene: It’s pretty neat too! It had a whole bunch of shims in it too, right?
Matt: Every measurement is down to the thousandth in the locker, so having enough shims to make the right combination is important. Sometimes you might need a 10 but then you might need to change a bunch of stuff around to make an 8 or a 9. When you’re dealing with shims having a wide selection is important.
Charlene: We started with an empty housing…let’s start building it up.
Matt: Normally you’d start with the ring and pinion set up with the factory shims that came in the axle from the factory, usually around 38-40 thousandths worth of shims. Because the housing was empty to start and we didn’t have any idea what the factory setup was, I guessed and I put in .039 worth of shims on pinion. With something like this, you are just going to have to try, and almost 100% certain that we are going to have to change the pinion shims, which we did.
We were able to get it together and start setting up our pattern so we could see what we had to change and what direction we had to go with the shims. When I say change direction; the gears interface and it needs to be almost perfect. That has to do with the depth of the pinion from the centerline of the axle. By moving it in and out, it changes the way the gears mesh. In order for the best set up and the strongest ring and pinion, you need the correct set up. So what we are doing is just throwing it together and getting the pinion in there, with a good guess, and then we are going to check the gears and patterns. We will know by our pattern if we need to move the pinion in or out to improve our mesh.
Charlene: What do you do once the pinion is installed?
 Matt: Once the pinion is installed with both bearings, we put enough preload on the bearings so that the pinion is tight, there’s no flop and there’s a little bit of drag on the bearings. Next, we will install the carrier. The carrier shims move it from side to side, which is called backlash, there actually needs to be some flop in between the 2 gears. It’s like 6-10 thousandths, so you’re dealing with a pretty small amount in a pretty tight measurement. Once you get your carrier in there with the right amount of flop, you can put the bearing caps on and spin a couple revolutions with a marking compound (it’s like a colored grease) and the gear will transfer a wear mark on the grease. It will leave a bare spot where the gear touches, and it will leave yellow everywhere else. That’s the pattern we are looking for. The pattern position on the tooth is the most important. It needs to be a soft edge all the way around, and you want it as centered on the tooth as possible. Sometimes the gears just don’t match perfect, they’re a little on the outside or a little on the inside, but the depth on the tooth, from the base to the top of the tooth should match to create that soft edge. It should mesh to create a stronger ring and pinion.
When you are working on an axle remember, every axle has a different set of specifications, like bearing preload and shim thicknesses. Pinion bearing preload is probably the most important thing to consider. On axles with crush sleeves there’s actually a tube that crushes it. There are the two bearings in there and you are tightening the pinion nut, while it crushes the crush sleeve. You need to pay really close attention because if you over-crush your crush sleeve the bearings will be too tight and you can’t reuse it. Having bearings too tight on a pinion is really bad, but at the same time having carrier bearings really tight makes for a stronger set up. There’s less chance of deflection; when the gears are under a load they’re not deflecting. You can’t have it too tight on the carrier but if you go too tight on the pinion they’ll burn themselves up. You’ll be replacing bearings.
Charlene: What do we need to do to in order to get ready to use the ARB set up? Is there anything at this stage of the game?
Matt: Well, the ARB Locker uses an air-line and air pressure to engage it and then lock the air locker. The ARB has an air collar that has two o-rings in it and a little copper tube. We need to run the copper tube up through the housing somewhere; we will pick a nice spot where it’s out of the way of the suspension and won’t get hit by anything on the outside of the axle. We also need enough room that the tube can be run on the inside of the diff cover and not ever get forced into the ring gear or hit by the diff cover. So, we just snake it up off the side, drill and tap a hole where it’s easy to get the fitting tight and check it for leaks, but at the same time it’s out of the way.
Charlene: Right. So that takes us to where the Yukon Gears are installed, ring and pinion is installed, ARB is installed, and we have a housing that has meat to it.